1929 Hudson Super Six Survivor - Parts Needed!

I recently acquired a 1929 Hudson Super Six Sedan which has spent the last 62 years in a museum without spinning a wheel the entire time! Hard to imagine, just this automobile is literally a time capsule, hop in and step back to 1959.... into a 30-year-old senior vehicle.
She is basically complete but does need some parts since my plan is to get her running again. I am a newbie to the HET club; hoping to lean on its esteemed members in the hopes of finding what I need, which is fortunately little. Top of the list:
Fuel tank sending unit (mine is completely disintegrated, the only part that actually failed completely).
Ignition parts like wires, rotor, cap, coil and points/condenser.
Boyce (or similar) Moto-Meter (threads are 2 1/4").
Windshield glass.
Mirrors (I have an interior mirror but nothing left or right, perhaps mounted on spare?).
Generator and starter motor brushes?
Wiper blade is completely missing, but the hand-actuated arm is there.
One cowl light lens is simple, pane glass so I am hoping to find a match to the original on the other side.
I also have a few questions:
My car only has one spare and it is tire mounted on the right front fender... there are holes on the left side in the same area but no depression into which the wheel would rest. What went there? Fitted fender luggage? There is evidence in the paint finish and running board that something was mounted there for a good, long time.
What model do I own? My VIN label seems proper (similar to others online) but the model number is left blank. I will try to post pictures to assist here. It has 3 windows along each side, all of which roll down and have the original roll-down blinds and still working!
What motor oil should I use, especially in the absence of any filtration whatsoever. Any recommended brands/products?
I have a battery disconnect but do not want to cut into the original wiring to modify. Any clever ideas?
I have the black Hudson Super Six insignia on the radiator surround... does that make it an "import"? I am in Vancouver, BC, Canada, this would tend to confirm that the original owner bought it in Canada.
Thanks to everyone and happy Hudsoning! (and Essexing and Terraplaning...)
Monte
0
Comments
-
Pics of my 1929 Hudson Super Six Sedan.0
-
What you have is a standard sedan with a Hudson-built all steel body. What a great find! I hope you are successful in getting it running. The radiator cap is original, there should be a temperature gauge on the dash. The tank unit is 180 ohms, and the die-cast gears usually fail when left dry, particularly for 62 years! Your best bet would be to get a generic one and modify it to fit in your tank. Everything looks factory standard, including the badge. There was a trunk rack which clips on the brackets that are there, which had a large triangle in the centre. The wiper should be a vacuum unit, and you can get new blades form Restoration supplies at: www.restorationstuff.com
Before you try and start the car, if the motor is not stuck, I suggest you drop the sump and check for holes in the oil troughs. sitting for this long it could have acid etching in the sump, so it would pay to check. You must fill the troughs before re-fitting the sump. A 20W-50 weight oil should be adequate, not sure what brands you have in Canada, but here in N.Z. we have Castrol Caltex, Penrite, Mobil, Shell, etc, so there should be plenty of choice. the clutch you can use Dexron 3 A.T.F. although it may be stuck after such a lo9ng time. Best of luck, and don't hesitate to ask for information or help.
Geoff (Technical Advisor, N.Z. H.E.T. Club)0 -
Great find and beautiful condition. For the oil;once the pan and the augets cleaned I will put back the SAE30 non-detergent as originally
Hudson Eight Sedan Luxe 1934 Survivor0 -
Burke, you mention not wanting to cut into the original wiring but if you are going to use the car all the wiring needs to be replaced. The original wiring presents a serious risk of an electrical fire, the 95 year old rubber insulation and cloth covering have become hard and brittle to the stage that they will flake off leaving exposed wires with the slightest movement. Fortunately it is possible to buy modern cloth covered wire so you can rewire and maintain the original appearance.0
-
Wow, great responses from everyone! Thanks for the feedback, will take all into consideration. I believe that my clutch is "stuck"... is there a procedure to free it up? I dropped the fluid, it seemed fresh and likely of the correct quantity too (about 3/4 of a pint, give or take) so I know that it had fluid all these years. Any and all thoughts here are appreciated.
Any pics available of the trunk rack? Anyone have a spare that they would part with?Previously, I didn't mention (or show pictures of) my original trunk. It was manufactured by "WW" in Jacksonville Michigan and came with all of the required mounting hardware inside, a real bonus. Would the car have had both a trunk and a rack in the rear?
The 180-ohm data was timely as I was about to buy a period NOS aftermarket unit which physically seemed right for my car. It had 90 ohms inscribed into it, so it wouldn't have solved my problem... and I would have wasted about $250+... so big thanks!
I am still quite puzzled by the left front fender fitment... if anyone had anything to share on that it would be helpful. A picture would really explain it well. I am guessing that most cars came fitted with spares mounted on both left and right.
I was thoroughly convinced that my hand-operated wiper system was original (it is) but failed previously to notice that there was a small pull-switch just to the left of it... and voila! Vacuum wipers indeed! I guess that the small hand-operated lever was in the event of a vacuum leak or maybe just to quickly brush away a small amount of moisture. I am thankful for the contact for the wiper blades, will put my order in ASAP.
I am still interested in the Boyce Moto-Meter, primarily to "jazz up" the rather non-descript front end treatment. Pardon the 1920s pun... but compared to the other senior autos like Packard and Peerless and such, I think a 127" wheelbase car is worthy of a more elaborate period-style radiator cap ornament to announced its arrival. I will always keep the ho-hum original cap, of course, for posterity, but would be interested in ideas others may have to give it the grand countenance it deserves.
Good suggestion about dropping the sump, I hadn't planned to before initial fire-up but I understand the logic. I am hopeful that time didn't take a heavy toll on this motor; it was stored with a full supply of engine oil (Reads "Full" by the sight glass) and even the oil looks fresh. This may have helped preserve the lower end parts, will know for sure this weekend. FYI - I soaked the cylinder bores and overhead valve train for a week in WD40 before my first try at cranking it over (with the original crank, nonetheless). It turned over with only the expected amount of resistance and there was no binding or unevenness in turning the engine over. I checked the overhead valve train and all seems to be in good working order. I also checked the timing chain play and was within the 1/8" specification as per the original "Instructors Book" that came with the car, so I think I am good there.
She also came with the original sales literature, a lively, full-colour three-panel affair. The seller was told (by the original owner, I am the third owner) that it is the original document he used to make his decision to buy the 1929 Hudson. The car also has its original BC Auto Club badge and a Temporary Permit dated 1959 which was used to transport the car from the original owner's home in Vancouver to the museum in New Westminster.
Thanks again, and if people have answers to my other questions, particularly about parts suppliers, I am quite interested.0 -
Standard fitment was only one spare, on the right hand side. Twin spares were optional. To unstick the clutch try filling with Dexron 3, and propping the clutch pedal down and rotate the engine regularly for a week or two. When you get the motor eventually running, try putting in top gear , foot on the clutch, and hit the starter. If that doesn't free it then I'm afraid there is no other way than stripping it down, you will most likely find the corks well and truly welded to the flywheel after that length of time. The 1928 Hudson had a flying man radiator cap. if you cant' find the original Hu
 dson one I can get you a newly made 1928 Essex, one, pic attached. 0
 -
Wise move on removing the sumps and checking the lubrication system, its not unknown for 60 year old sump oil to turn to a jelly.0
-
There are battery disconnects that connect between the battery post and the battery cable , thus not molesting your wiring as a prevention of electrical problems. Although Ido agree that it's best to rewire if it's going to get much use ...Beautiful 29 ... Bill0
-
Thanks for adding your wisdom and expertise here. I removed the sump yesterday and - no real surprise here - it was 100% in perfect order. It almost seemed as if the motor was built yesterday and aside from a slight tinge to the oil colour, everything appeared as you would expect from a new motor. I peered up into the cylinder bores and they appear as new; absolutely no gel, slime, rust, blocked passages or damage anywhere. Good to know, I will reinstall the sump and fill it up with oil and revel in the comfort that all is in good order.
Every picture of 1929 Hudson Super Six cars I can find on the internet shows two spare wheels (one on left fender, one on right) so I h=guess the majority were supplied with the optional second spare. What would have attached to the right fender, in the absence of a spare wheel? As I mentioned earlier, there are holes drilled in the fender and running board to mount something, and there is obvious wear to the finish of the fender which suggests that something was mounted there for a good long time. My father's 1924 Packard 243 had a fitted "luggage" in that same location; it was a permanently-mounted box that had doors that allowed you to remove a hatbox and other special-fitted boxes containing items you would take when you travel. Did my Hudson possibly have the same? While it is possibly a custom-made fitment, all evidence suggests it was commercially manufactured.
Excellent suggestion on the clutch issue, thanks. I have every confidence that, like everything on this pampered machine, it will come up nicely if I apply an equal amount of patience and logic. It makes sense that continued and shifting pressure over time will produce the desired results - metamorphic rocks are formed this way! Will report my results later.
Was the "flying man" radiator cap ever used on the 1929? I would be interested in the Essex radiator cap, please circle back with a cost. Where are you located?0 -
I mounted my battery disconnect in my 29 on the passenger side through where the steering column would mount if the car was right hand drive. The hole is already there, the switch is under the hood with the handle sticking through near the cowl inside the car. Battery cable connects to switch, short cable to starter switch. New reproduction wiring harness is available from YNZ’s yesterday parts in California. I’ve done both of my 29’s this way with their harness’s0
-
No, the flying man was never used on the '29's apart from retrospectively by restorers or owners who like the look of them. I am in New Zealand. You can email me at NZgeoffclark@xtra.co.nz (Leave off the leading "NZ" that's to foil the spambots). As to the wiring, if your car has been sitting for so long unused I would recommend you inspect the wiring closely. Originally the wiring was steel armoured outside the bulkhead and along the chassis, and if it is still original and not rusted then I reckon it will still be servicable. I have had my 1928 Essex for 65 years, and it still has most of it's original steel armoured wiring, in spite of being in constant use over half a million miles.0
-
I also inspected my wiring; mine has stopped since 1954; I have made some repairs but it is clean and I intend to keep it original. A good circuit breaker when you do not ride with it and a beautiful 5KG fire extinguisher in the vehicle in case of cuckoo.
0 -
Thanks, Geoff. Do you have a price in mind for the Essex radiator cap? It's quite nice. Since all things of grace and beauty take on feminine qualities, I am inclined to install the Essex radiator cap even if it isn't specifically correct for a Hudson.
I will definitely check out the right-hand steering column opportunity to install the battery disconnect. If I understand correctly, I won't need to cut the original starter wiring but will need to make up a short piece to go from the disconnect switch to the starter switch under the starter motor. If I can make this work, it's an awesome solution in my opinion and doesn't require cutting original wiring! Thanks also for the contact to locate a new wiring harness, will check into that.
Like most things on this car, the original wiring is in amazing original condition. The ignition wiring is really the only wires that have shown any signs of deterioration, presumably because of its proximity to a source of high heat (the motor). The rest of the wiring, from my initial surface-level inspection, is still quite supple and runs through original steel wiring looms (as you described), none of which appears to have any wear or chafing or abuse. I will continue to assess the wiring but my first examination gives it a pass, for now. My car has only logged 45,000 miles, which the seller claims is total original mileage.
In many ways, this car stands as an example of an undisturbed/original car. As I drill into its 2021 refresh, I keep running into parts and assemblies that are clearly "as manufactured" and likely never tampered with, ever. Most fasteners, even on the exhaust, require a socket or wrench to untorque it, then my fingers do the rest of the work to remove the nut.
I was informed by another club member that I am fortunate to have your attention... apparently you know more about Hudsons than many! I am thankful for your sagely wisdom and experience. I have restored well over a dozen vehicles but every one brings on its own character and vagaries.
Thanks for all feedback here, all being taken in and considered. KI cannot wait to see what goodies and surprises tomorrow will reveal...0 -
A photo of the circuit breaker montage?
0 -
We are quazi with the same style of vehicle. Yours yours 45000MILES 72000KM. Mine 52868KM 0U 32850 MILES. All is like has its factory output also;no bolts blocked or wedged and a host of detail that proves that the vehicle is original and has been well preserved. A pleasure to work on this kind of vehicle. It changes me from the work on the old vw beetle
0 -
To Jack and Bob's comments about engine sump/oil, I'd like to offer thanks for their sagely advice. I have to confess that when I first removed the sump pan and reported my findings, I was unaware initially that the sump is a two-piece affair (I will refer to as "pan" and "separator", my terminology) and was hiding the "nasty stuff" underneath (Bob alluded to "jelly", which is a fairly apt description but probably wouldn't taste very good as a spread). After dumping the viscous contents, it took a spatula to remove the jelly from the lower sump pan. My parts cleaner got a serious workout as I removed the remainder and returned the two-part sump to a sparkly-clean condition.
To me, this serves (to a degree) as a warning to the disadvantages of lack of modern-style oil filtration and the importance of removing the sump regularly and cleaning as a routine operation. The design clearly is intended to relegate the heavier nasty stuff and particulates to the very bottom of the sump, separated from everything else by the "separator" piece. I confess that I have never experienced this type of a system first-hand, and I can surmise that this concept was completely abandoned when the element- or cartridge-style filter came into popular use. Who wants to drop the entire sump when a removable/disposable component would do pretty much the same job? And the problem got worse as straight-eights appeared on the scene with heavier sumps, I imagine.
This may have already been discussed numerous times here, just adding my observations. I am 58 years young and have restored many vehicles, too many projects to list, but this is my first car from the era before modern oil filters. I am quickly forming a conclusion that these old vehicles weren't automobiles so much as a lubrication schedule on wheels. How many people have to squirt oil into 6 little cups at the top of their engine every 500 miles to ensure their top end valve train gets proper lubrication? I have no doubt that every mile traveled was thoroughly enjoyed but hard won. Kudos to the pioneers...0 -
You do not understand the operation of the engine. It does not have full pressure lubrication like you are used to on the cars you have worked on before. The rods only get their lubrication by dipping in the little trays on the upper sump. They also "splash " oil up to the cam and valve train. The oil pump is low pressure. could not have fed a full circulation oil filter. Oils were non-detergent back then. They did not suspend bits of carbon and other debris in the oil like modern oil. Don't forget to fill the top troughs during reassembly. You will burn up the rod bearings before the oil pump can fill the top troughs.0
-
Thank you for your suggestion (as did Geoff above) about filling the troughs before re-assembly, duly noted and easily understood. But I don't understand why you would think I don't understand the lubrication system, nothing I have said would suggest otherwise. Splash-type lubrication was exactly how modern small engines (many, anyways) are still lubricated today, without the benefit of an oil pump! These are the very engines that I cut my teeth on over 50 years ago and I still completely understand them today, thank you. Not everything lubrication system employs a pump, I think most people in this group get that and can adapt their thinking to incorporate a low-pressure pump (and overhead gravity-fed lubrication on the upper valve train).
I think you missed my point about the separator... as well as act as a trough to suspend lubrication to the lower end, it also acts as a barrier to allow heavier particulates and debris (since NO detergents in the oil) and other matter to fall down into, hopefully trapped below and not to return to the system, well, not easily. I never suggested or thought that was its only purpose.
The main point I was making is that when I disassembled the bottom end, the troughs were filled with GOOD CLEAN OIL which, until I realized that there was a separator piece, fooled me into thinking that ALL the engine oil was newish and only lightly tinged. What lay below the separator piece in the lower "bilge" was nasty and ugly, proof positive that the system, primitive as it was without a modern filter in play, works.
I am thankful that all the troughs seem to be in good order, shiny, strong, unperforated clean metal and still holding oil. Thanks for your valid points Geoff, I clearly understand the importance of having these troughs in 100% condition for the system to work.0 -
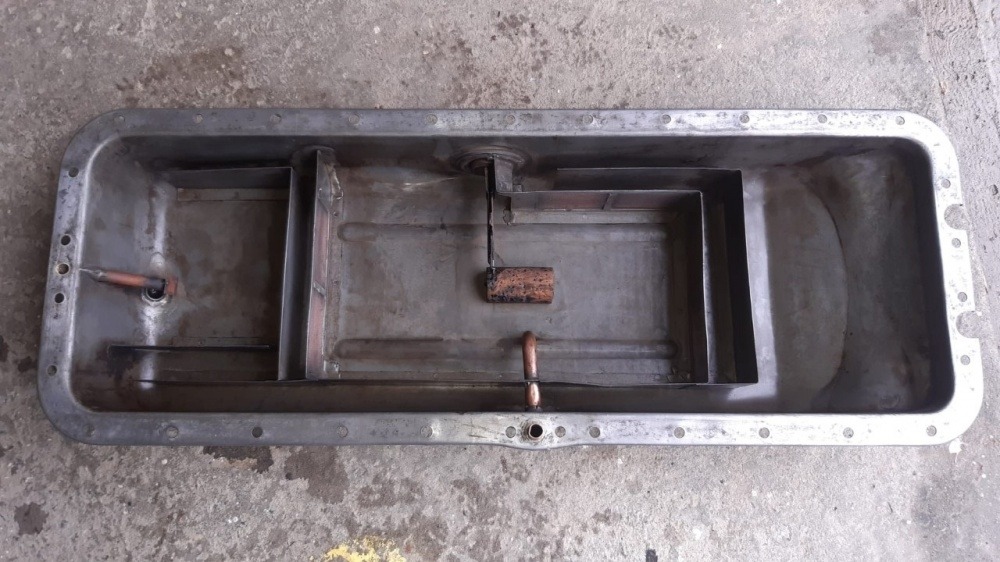
I thought it might be interesting to show pics of the "pan" and "separator" which together make up the sump of my 1929 Hudson Super Six
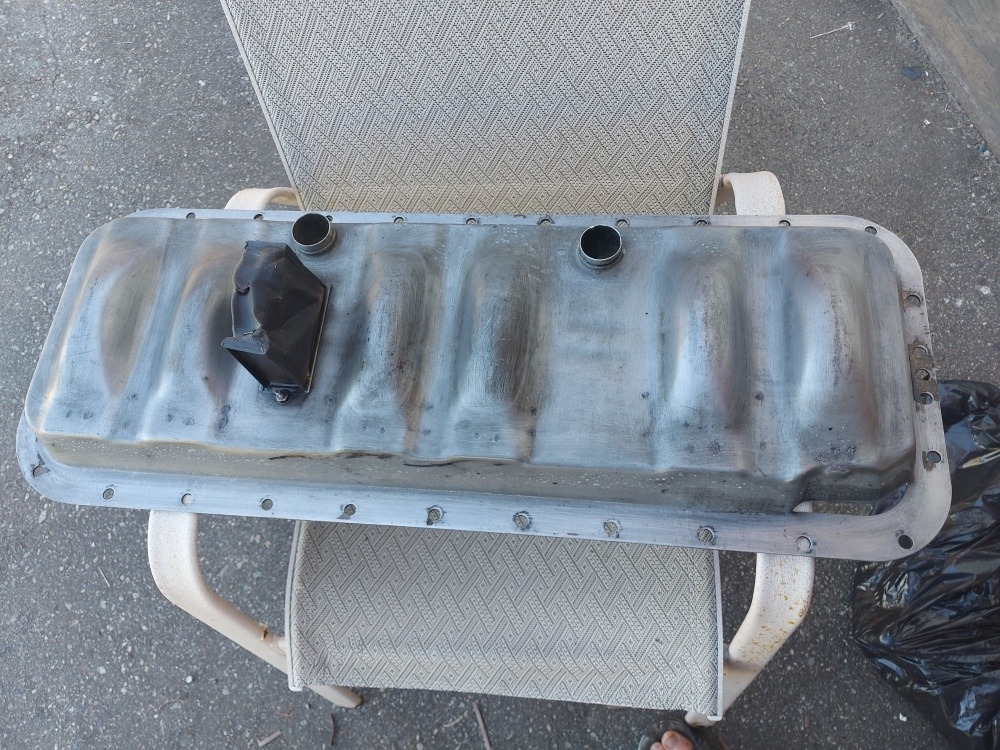
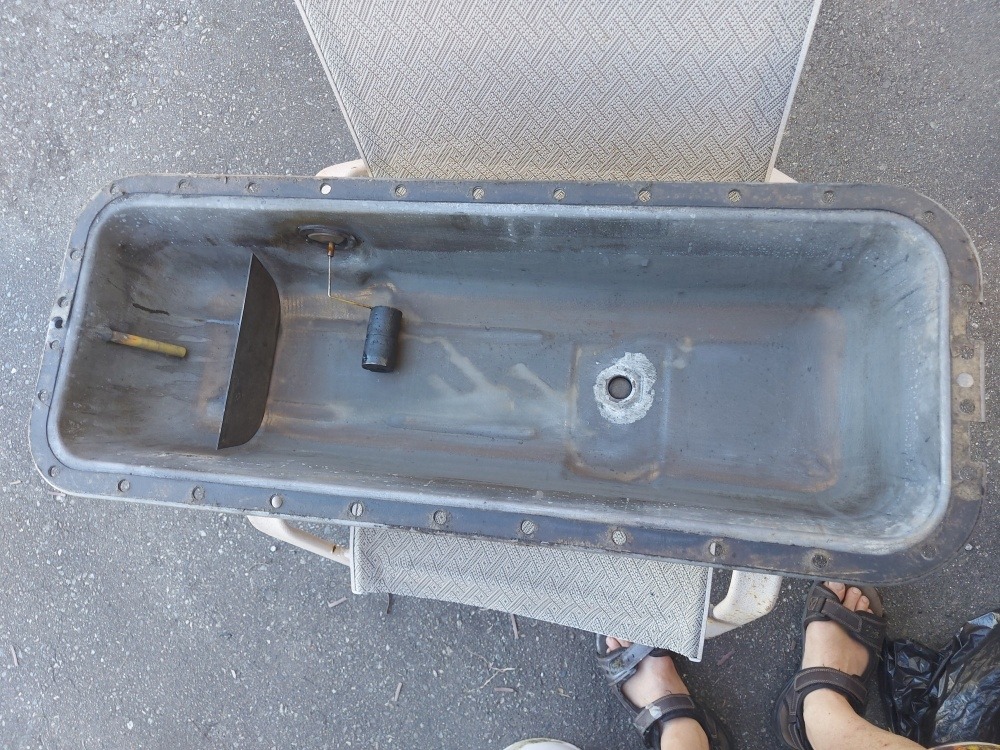
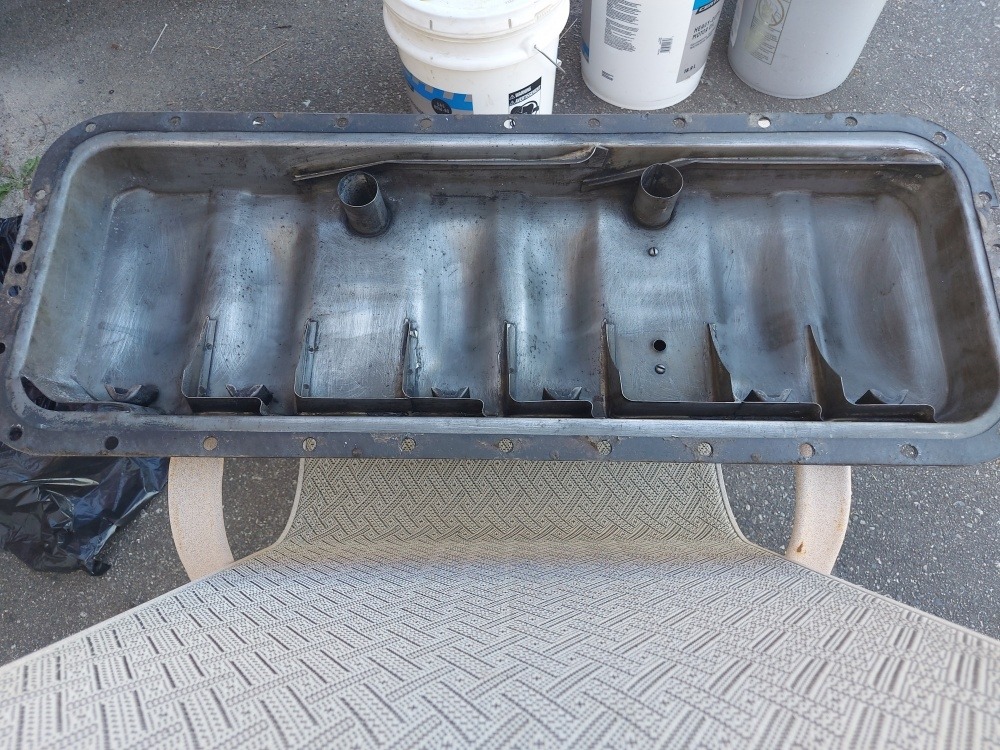
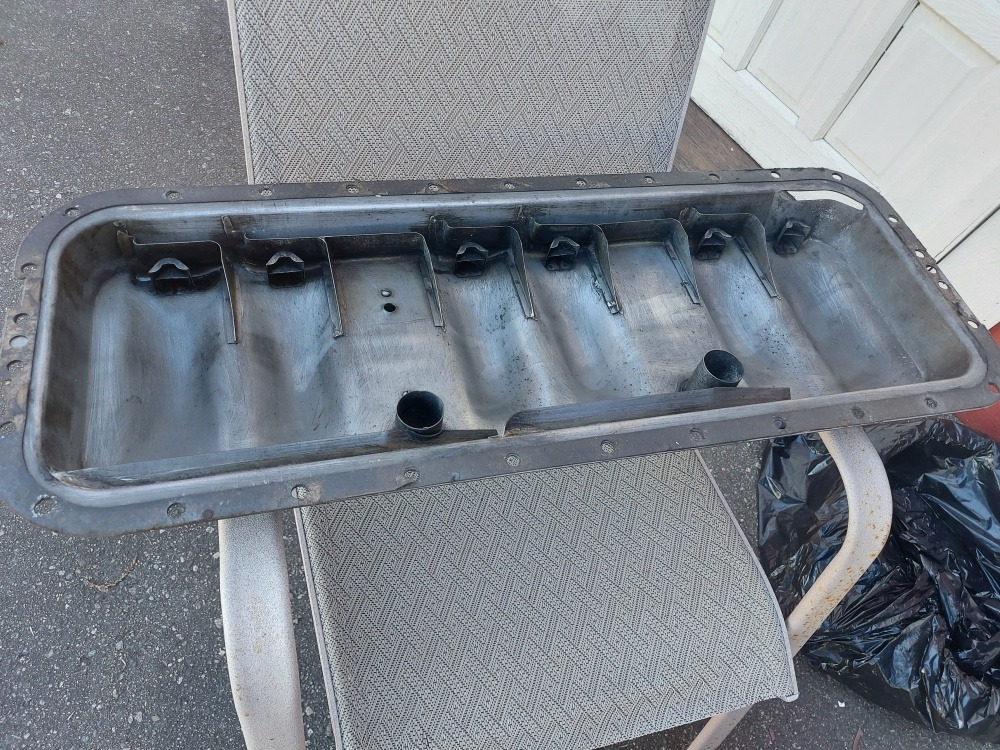
 . I spent little time cleaning them - haven't fully completed that task yet - but they clearly show the condition of the parts, literally "as found" after 60+ years with a sump full of oil. 0
 -
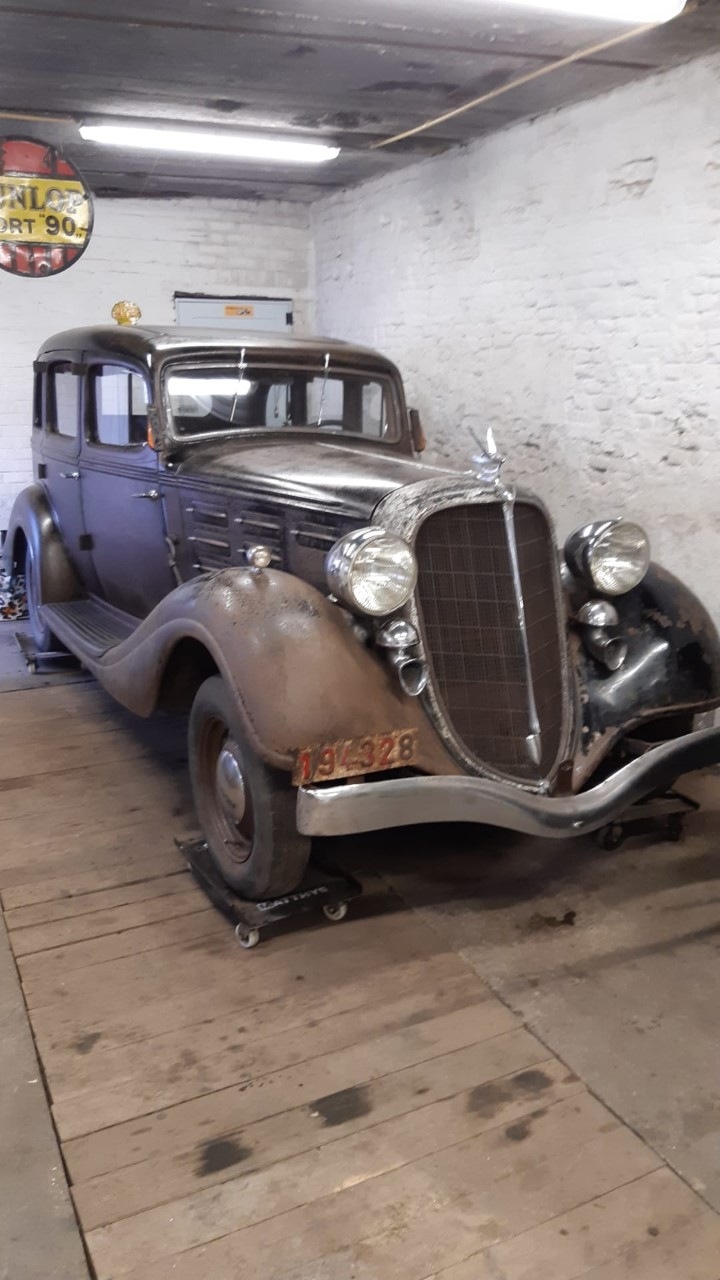
Nice job. Here is mine on my 34 8 Cylinders.C is lightly different.


0 -
Quite similar, aren't they? Is it back in a running car?
0 -
Soon on the move
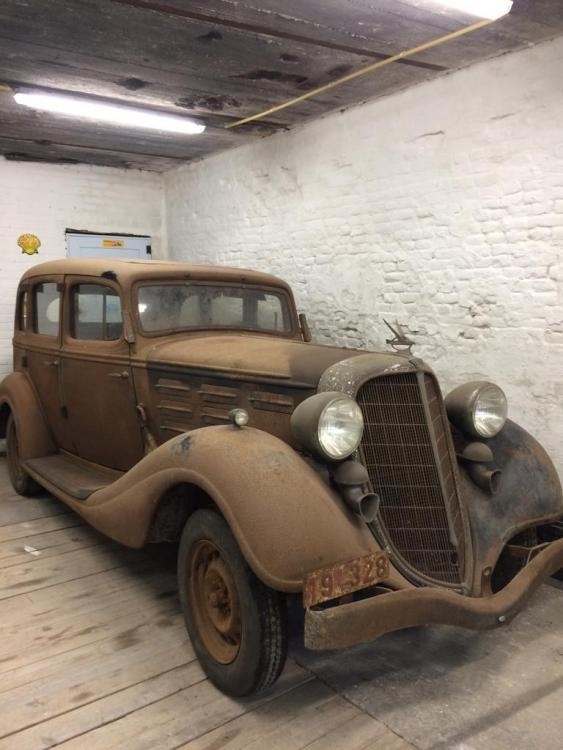
Just cleaned after 66 years of stoppage after a long storage
0 -
She's a real beauty!0
-
What did you do to alter the finish? I may need to do the same with mine, to prevent further rust.0
-
I removed the surface rust with iron straw00. wd 40 to the cloth everywhere. Then the part with paint.simonis for cellulosic paint. And to finish the protrecteur from restom. Placed with a brush
https://www.matthys.net/fr/protection-anticorrosion-incolore-6100-250-ml-protec-look-6100-250-ml-1171050
0 -
For chromium;aluminum foil dipped in coca light and rub. This enplevates the oxidation crust. Then pate to polish to finish0
-
can you explain what coca light is ?And what do you mean by “ then plate to polish to finish”
beautiful car !!0 -
Thanks, Paul, you asked what everyone was thinking! I was also wondering if "iron straw00" was what we might call "steel wool"... although I will take a pass on using steel wool on my car's finish. Google wasn't helpful here. I won't be spraying my car's cloth (mohair, actually) interior with WD40 either.
Whatever Jack has done it looks fantastic, keeps it in original form and will likely help to shore up the advance of entropy. I'm interested! Jack, if you could possibly try to take a second try at explaining your ideas it would be very helpful and appreciated!
Jack is in Belgium, which suggests a possible French influence in his language. "Pate" means paste in French so he probably meant chrome paste polish.0 -
Hello;thank you. So it's well oo steel wool. Then WD40;then degreasing;polishing with product for cellulosic paint and then to finish product restom and this for the bodywork. For chromium;a piece of household foil;soak in coca cola and rub to remove the oxidation layer. Then when the chromium is seen rubbing with the chrome paste
before

0 -
I have had great luck using a paste made from adding water to a household cleanser called Bar Keepers friend. Apply it liberally and use VERY LITTLE ELBOW GREASE, just rub it in lightly and apply more each time it begins to evaporate. The oxalic acid is what dissolves the rust and brightens up the remaining chrome and cleanses the paint of the rust. I use home made Waxoyl to prevent the return of the rust but it must be reapplied occasionally. It’s an expensive product from England but you can make your own fairly inexpensively from recipes online.BurkeHudson6 said:Thanks, Paul, you asked what everyone was thinking! I was also wondering if "iron straw00" was what we might call "steel wool"... although I will take a pass on using steel wool on my car's finish. Google wasn't helpful here. I won't be spraying my car's cloth (mohair, actually) interior with WD40 either.
Whatever Jack has done it looks fantastic, keeps it in original form and will likely help to shore up the advance of entropy. I'm interested! Jack, if you could possibly try to take a second try at explaining your ideas it would be very helpful and appreciated!
Jack is in Belgium, which suggests a possible French influence in his language. "Pate" means paste in French so he probably meant chrome paste polish.0


Categories
- 36.9K All Categories
- 111 Hudson 1916 - 1929
- 20 Upcoming Events
- 92 Essex Super 6
- 28.6K HUDSON
- 569 "How To" - Skills, mechanical and other wise
- 995 Street Rods
- 151 American Motors
- 178 The Flathead Forum
- 49 Manuals, etc,.
- 78 Hudson 8
- 44 FORUM - Instructions and Tips on using the forum
- 2.8K CLASSIFIEDS
- 606 Vehicles
- 2.1K Parts & Pieces
- 77 Literature & Memorabilia
- Hudson 1916 - 1929 Yahoo Groups Archived Photos