Electrolytic Rust Removal
![[Deleted User]](https://forum.hetclub.org/applications/dashboard/design/images/defaulticon.png)
Restoration is about 99% perspiration and 1% finding out reproduction parts don't fit. Since getting dirty and sweating aren't on the "fun things to do" list, yet a good portion of work is cleaning and prep of rusty car parts, I've employed a few shortcuts to make the job easier. Electrolytic rust removal is one of them. It's super simple and very effective! I used it extensively on my last restoration and plan on taking it to another level on this one!
To make it work, you really only need a few items:
1. A low amperage battery charger. I have a Shumacher 6V unit I ran over with my hotrod chassis about 15 years ago, and it does the job well, scrapes and all.
In the photo, I'm running a higher amperage than usual to see if it makes a difference in the removal rate (as an experiment) I normally run it at 6V/2amp.
2. A box of Arm and Hammer LAUNDRY soda. It's about 4 bucks for enough to do an entire car, assuming you had access to a pool!
3. Some sort of container large enough to contain the components you plant on cleaning. I used a big tub for the rims. It's my wife's tub (please don't tell her!)
4. Water.
5. Hunks and chunks of iron/steel to use as sacrificial anodes (+).
That's it! Let's get to cleaning!
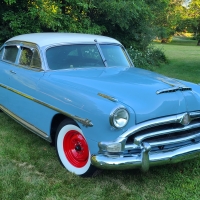
The wheels on this Hudson are particularly disgusting. The car was a field car, and it sat for many years with the tires off the beads. The former owner thought me crazy for wanting the stock rims, but he's a street rodder. They put mags on EVERYTHING! three of the four rims won't hold air for much more than an hour at a time, and I need to be able to roll this car around, which meant I had to clean the rims. Now - I could spend a few hours on each rim with a wire brush, covering myself in orange and black dust while experiencing acupuncture by errant wires, or sit here in front of a cozy fire and let physics do the work. I choose the latter.
For optimal results, it's best to have a couple of sacrificial anodes surrounding the part to be cleaned. Some folks use rebar around the tub and wire it together, but I'm averse to buying something when I have rusty donor car parts sitting around. In this case, I'm using a Triumph TR4 cylinder head - lots of material and lots of surface area. To clean the wheel evenly, I'll have to rotate it occasionally. I'm okay with that.
Fill the tub with water until the part is submerged. Add about 1 TSP of Laundry soda per gallon (more is okay, but it doesn't really speed things up) and make sure it dissolves. Add the metal used as a sacrificial anode and clamp the RED (+) terminal to the part you're about to make look REALLY nasty. If you're using more than one piece of metal as a sacrificial, wire them together so current can flow from each of them. Use IRON or STEEL only - black iron pipe, rebar, old dead camshafts, etc. DON'T use any chrome-plated parts, they're release a toxic gas. As it is, you'll be making hydrogen, so a well ventilated area is a must. Make sure the connection to the anode is above the water line! Otherwise, you'll eat up whatever you're using as a connector! in this case, half the head is out of the water, so the connection was easy. The cathode (-) connection can be under water, as it won't corrode. Here's what the setup looked like shortly after dropping the rim in and turning on the electricity:

The water near the head was a little orangey, but it was pretty clear. The flow of electricity is from the rim to the head, and the process loosens up rust while turning it black. A little over 12 hours later the tub looked like this. It had been untouched.

The fizzies you see are hydrogen releasing. The water actually circulates from the bubbles formed by the current flow! 24 hrs later, it looked like this. I'd turned the rim 90 degrees.

The power was turned off and the rim removed for rinsing/inspection Most all the rust has been removed from the face of the rim. There's still some there as it wasn't turned a full 180 degrees. More importantly, the bead has cleaned up, and almost all heavy scale is gone!

There's some pitting which may require epoxy filler and sanding, but we'll see after the rim is cleaned. It needs a light wire brushing to remove all the black oxide. There's still some rust on what was the backside of the rim, so it's back into the tub for another 12 hours.

The bead area is pretty clean on this side. I'll pull it in the morning, clean it with a wire brush and show you what the finished product looks like. It will get a coat of primer and then a color coat simply to have accomplished something each day!
To make it work, you really only need a few items:
1. A low amperage battery charger. I have a Shumacher 6V unit I ran over with my hotrod chassis about 15 years ago, and it does the job well, scrapes and all.
In the photo, I'm running a higher amperage than usual to see if it makes a difference in the removal rate (as an experiment) I normally run it at 6V/2amp.
2. A box of Arm and Hammer LAUNDRY soda. It's about 4 bucks for enough to do an entire car, assuming you had access to a pool!
3. Some sort of container large enough to contain the components you plant on cleaning. I used a big tub for the rims. It's my wife's tub (please don't tell her!)
4. Water.
5. Hunks and chunks of iron/steel to use as sacrificial anodes (+).
That's it! Let's get to cleaning!
The wheels on this Hudson are particularly disgusting. The car was a field car, and it sat for many years with the tires off the beads. The former owner thought me crazy for wanting the stock rims, but he's a street rodder. They put mags on EVERYTHING! three of the four rims won't hold air for much more than an hour at a time, and I need to be able to roll this car around, which meant I had to clean the rims. Now - I could spend a few hours on each rim with a wire brush, covering myself in orange and black dust while experiencing acupuncture by errant wires, or sit here in front of a cozy fire and let physics do the work. I choose the latter.
For optimal results, it's best to have a couple of sacrificial anodes surrounding the part to be cleaned. Some folks use rebar around the tub and wire it together, but I'm averse to buying something when I have rusty donor car parts sitting around. In this case, I'm using a Triumph TR4 cylinder head - lots of material and lots of surface area. To clean the wheel evenly, I'll have to rotate it occasionally. I'm okay with that.
Fill the tub with water until the part is submerged. Add about 1 TSP of Laundry soda per gallon (more is okay, but it doesn't really speed things up) and make sure it dissolves. Add the metal used as a sacrificial anode and clamp the RED (+) terminal to the part you're about to make look REALLY nasty. If you're using more than one piece of metal as a sacrificial, wire them together so current can flow from each of them. Use IRON or STEEL only - black iron pipe, rebar, old dead camshafts, etc. DON'T use any chrome-plated parts, they're release a toxic gas. As it is, you'll be making hydrogen, so a well ventilated area is a must. Make sure the connection to the anode is above the water line! Otherwise, you'll eat up whatever you're using as a connector! in this case, half the head is out of the water, so the connection was easy. The cathode (-) connection can be under water, as it won't corrode. Here's what the setup looked like shortly after dropping the rim in and turning on the electricity:
The water near the head was a little orangey, but it was pretty clear. The flow of electricity is from the rim to the head, and the process loosens up rust while turning it black. A little over 12 hours later the tub looked like this. It had been untouched.
The fizzies you see are hydrogen releasing. The water actually circulates from the bubbles formed by the current flow! 24 hrs later, it looked like this. I'd turned the rim 90 degrees.
The power was turned off and the rim removed for rinsing/inspection
Most all the rust has been removed from the face of the rim. There's still some there as it wasn't turned a full 180 degrees. More importantly, the bead has cleaned up, and almost all heavy scale is gone! There's some pitting which may require epoxy filler and sanding, but we'll see after the rim is cleaned. It needs a light wire brushing to remove all the black oxide. There's still some rust on what was the backside of the rim, so it's back into the tub for another 12 hours.
The bead area is pretty clean on this side. I'll pull it in the morning, clean it with a wire brush and show you what the finished product looks like. It will get a coat of primer and then a color coat simply to have accomplished something each day!
0
Comments
-
Thanks for the great email and pictures.
Washing soda is fantastic stuff.
I haven't used it yet on the car but
If you want to clean silver plate or sterling you only need to place some aluminium plate in a plastic tub full of boiling water adding a few tablespoons of washing soda. Any silver placed in the tub must be under water and touching the aluminium plate. I've never used polish or rubbed silver to shine it. I've got a solid silver tea service from 1828 which is as shiny as the day it was made. Just remember to wash the silver under clean running water and dried. No need to use current. I can clean all the silver in the house in about 30 minutes and they dont end up with white polish remains or black hands. Cheers ken0 -
Your photos take a loooong time to load. Maybe you could cut down on the size?0
-
It works only if the process is sped up with the addition of electrical current. I'll have the rim out today for cleaning with a wire brush and will post photos.ken1962 said:Thanks for the great email and pictures.
Washing soda is fantastic stuff.
I haven't used it yet on the car but
If you want to clean silver plate or sterling you only need to place some aluminium plate in a plastic tub full of boiling water adding a few tablespoons of washing soda. Any silver placed in the tub must be under water and touching the aluminium plate. I've never used polish or rubbed silver to shine it. I've got a solid silver tea service from 1828 which is as shiny as the day it was made. Just remember to wash the silver under clean running water and dried. No need to use current. I can clean all the silver in the house in about 30 minutes and they dont end up with white polish remains or black hands. Cheers ken
0 -
Sorry. I have high speed internet and I forget that a 2 meg photo takes time if someone doesn't have it. I'll see what I can do.lostmind said:Your photos take a loooong time to load. Maybe you could cut down on the size?
0 -
I had no issue.ChuckSherman said:
Sorry. I have high speed internet and I forget that a 2 meg photo takes time if someone doesn't have it. I'll see what I can do.lostmind said:Your photos take a loooong time to load. Maybe you could cut down on the size?0 -
So here's what things look like about 12 hours later:

Running the process at a higher amperage does remove more rust, it appears. After a rinse and a rub down with a rag, the rim looked like this: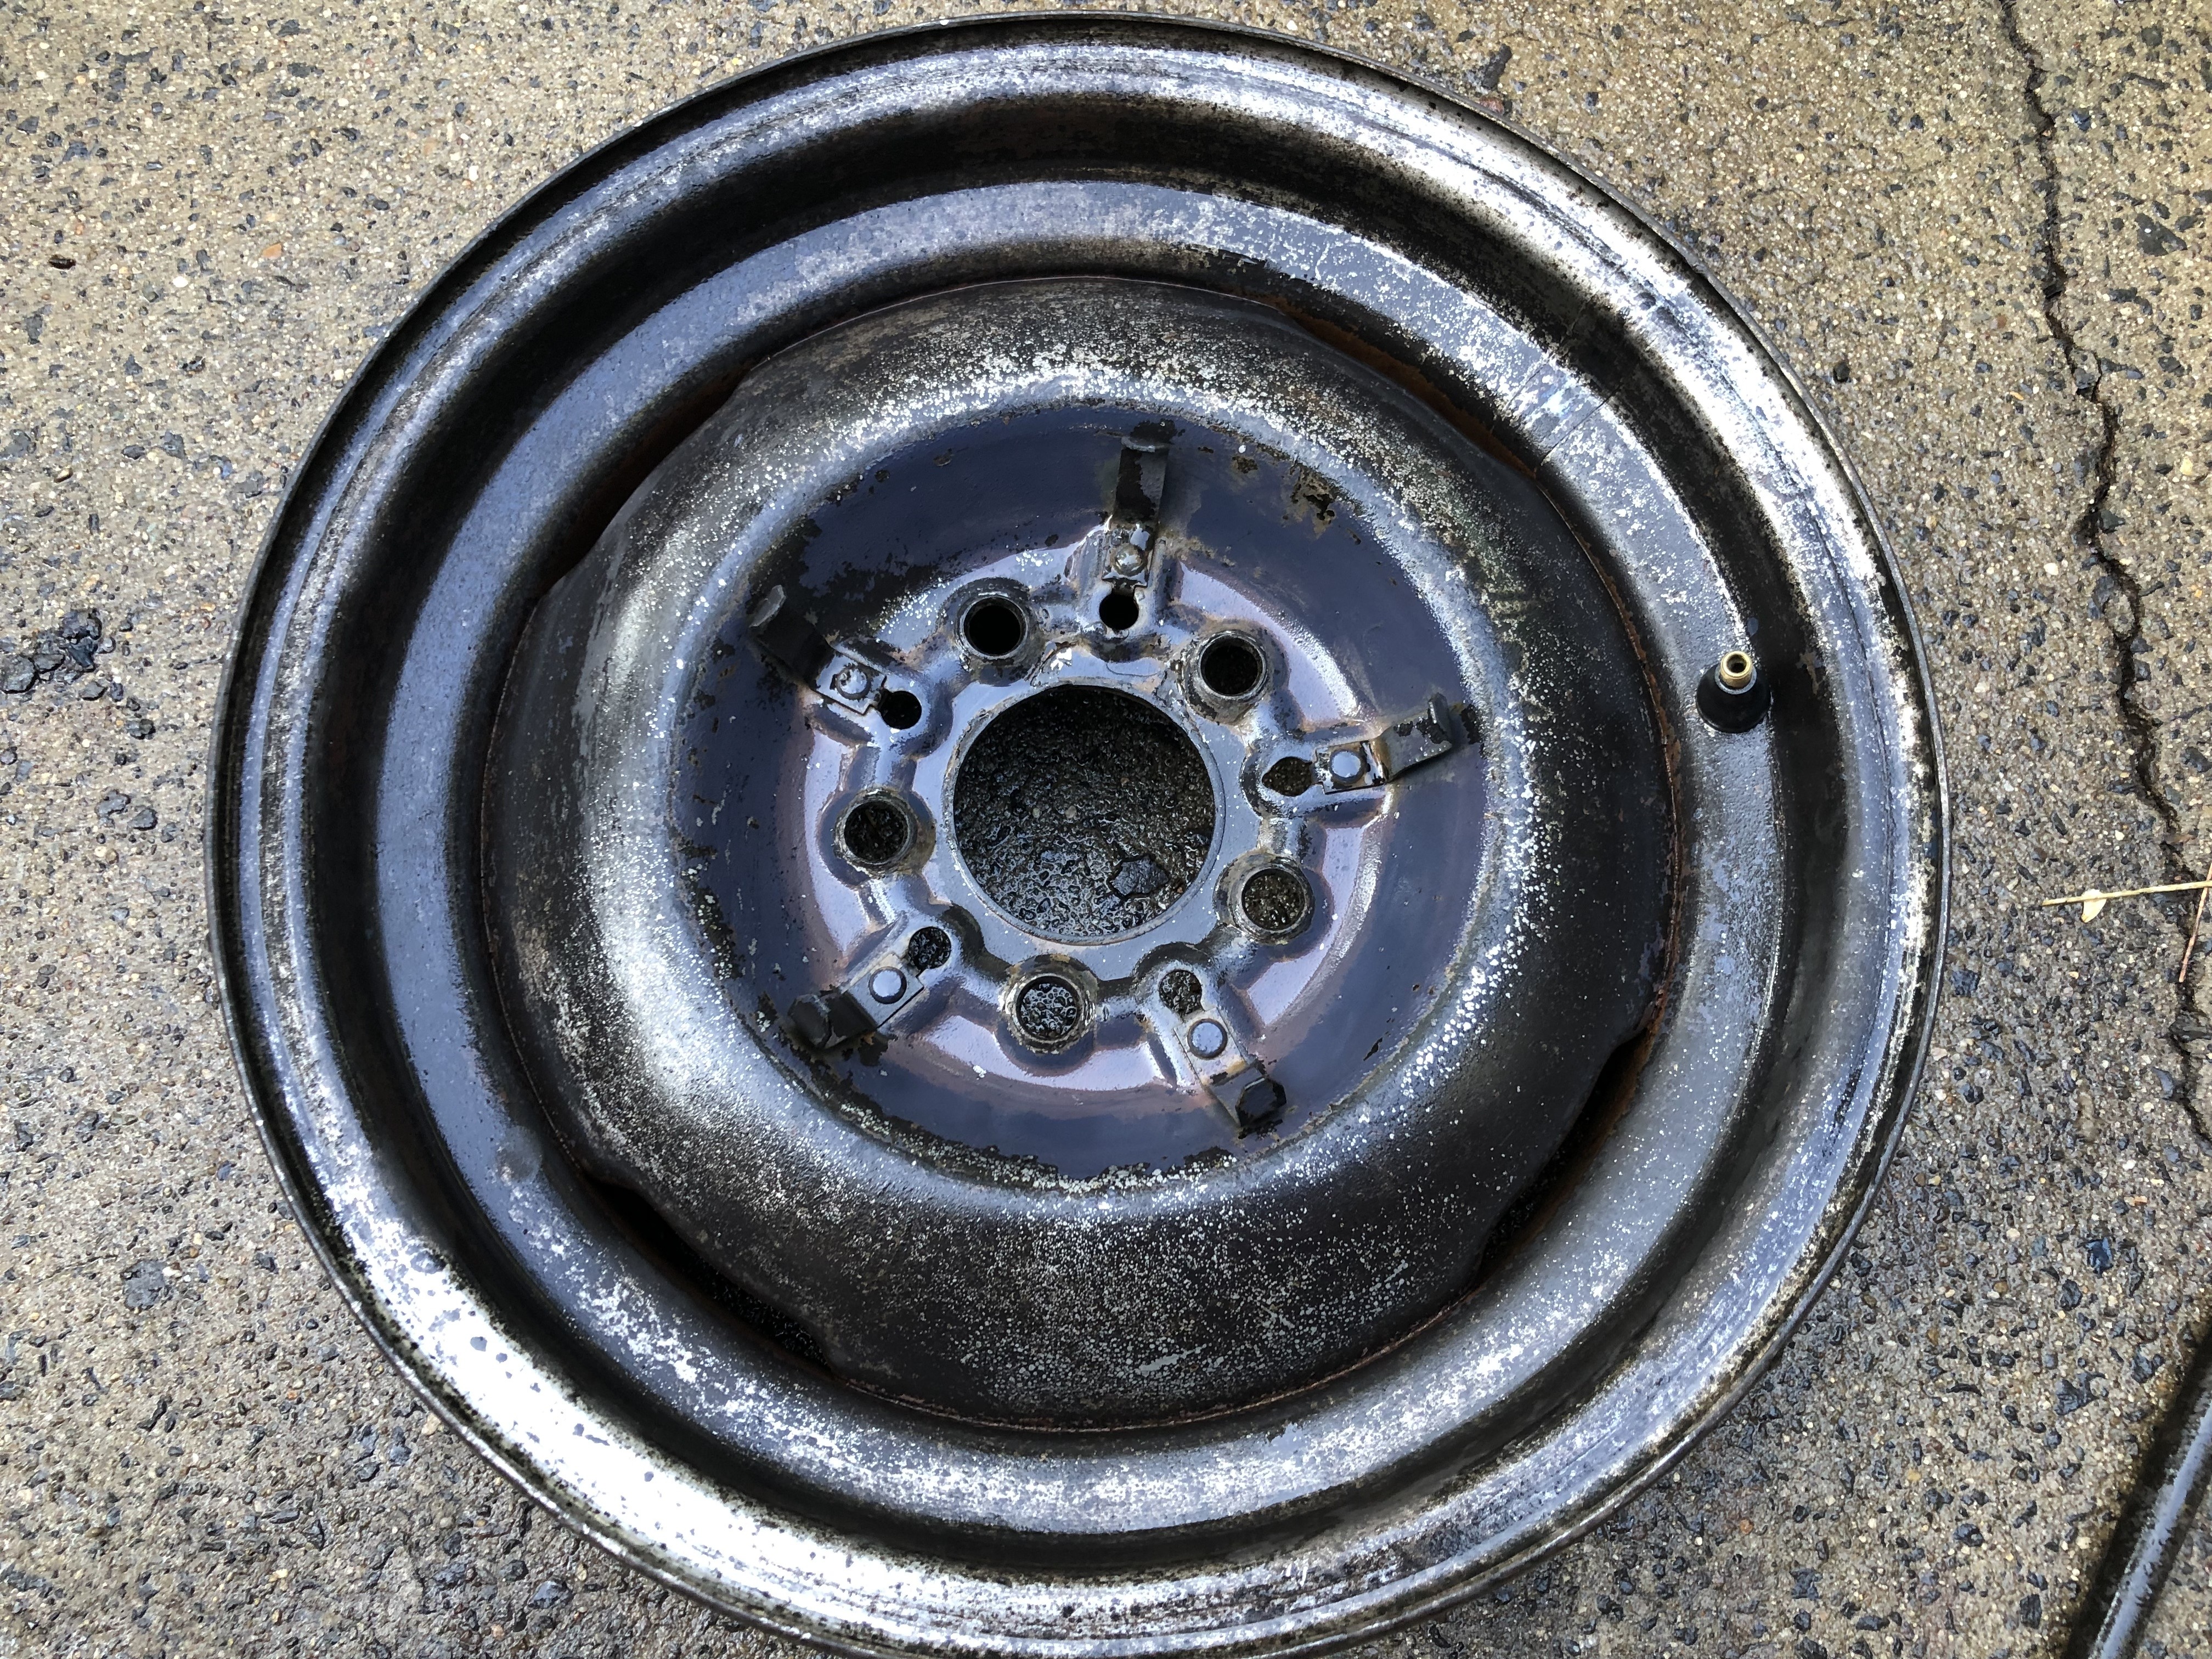
There's pitting on the sealing surface to be filled, about 8". overall, the inside is fine, it will be wire brushed and hit with some rust converter before a coat of paint.
20 minutes of wire brush (chucked in a crappy small cordless as I put my good drill motor in a "special" place - and cannot find it) the exterior of the rim looked like this:
This is the worst of the exterior pitting. Note the cleanliness of the pits.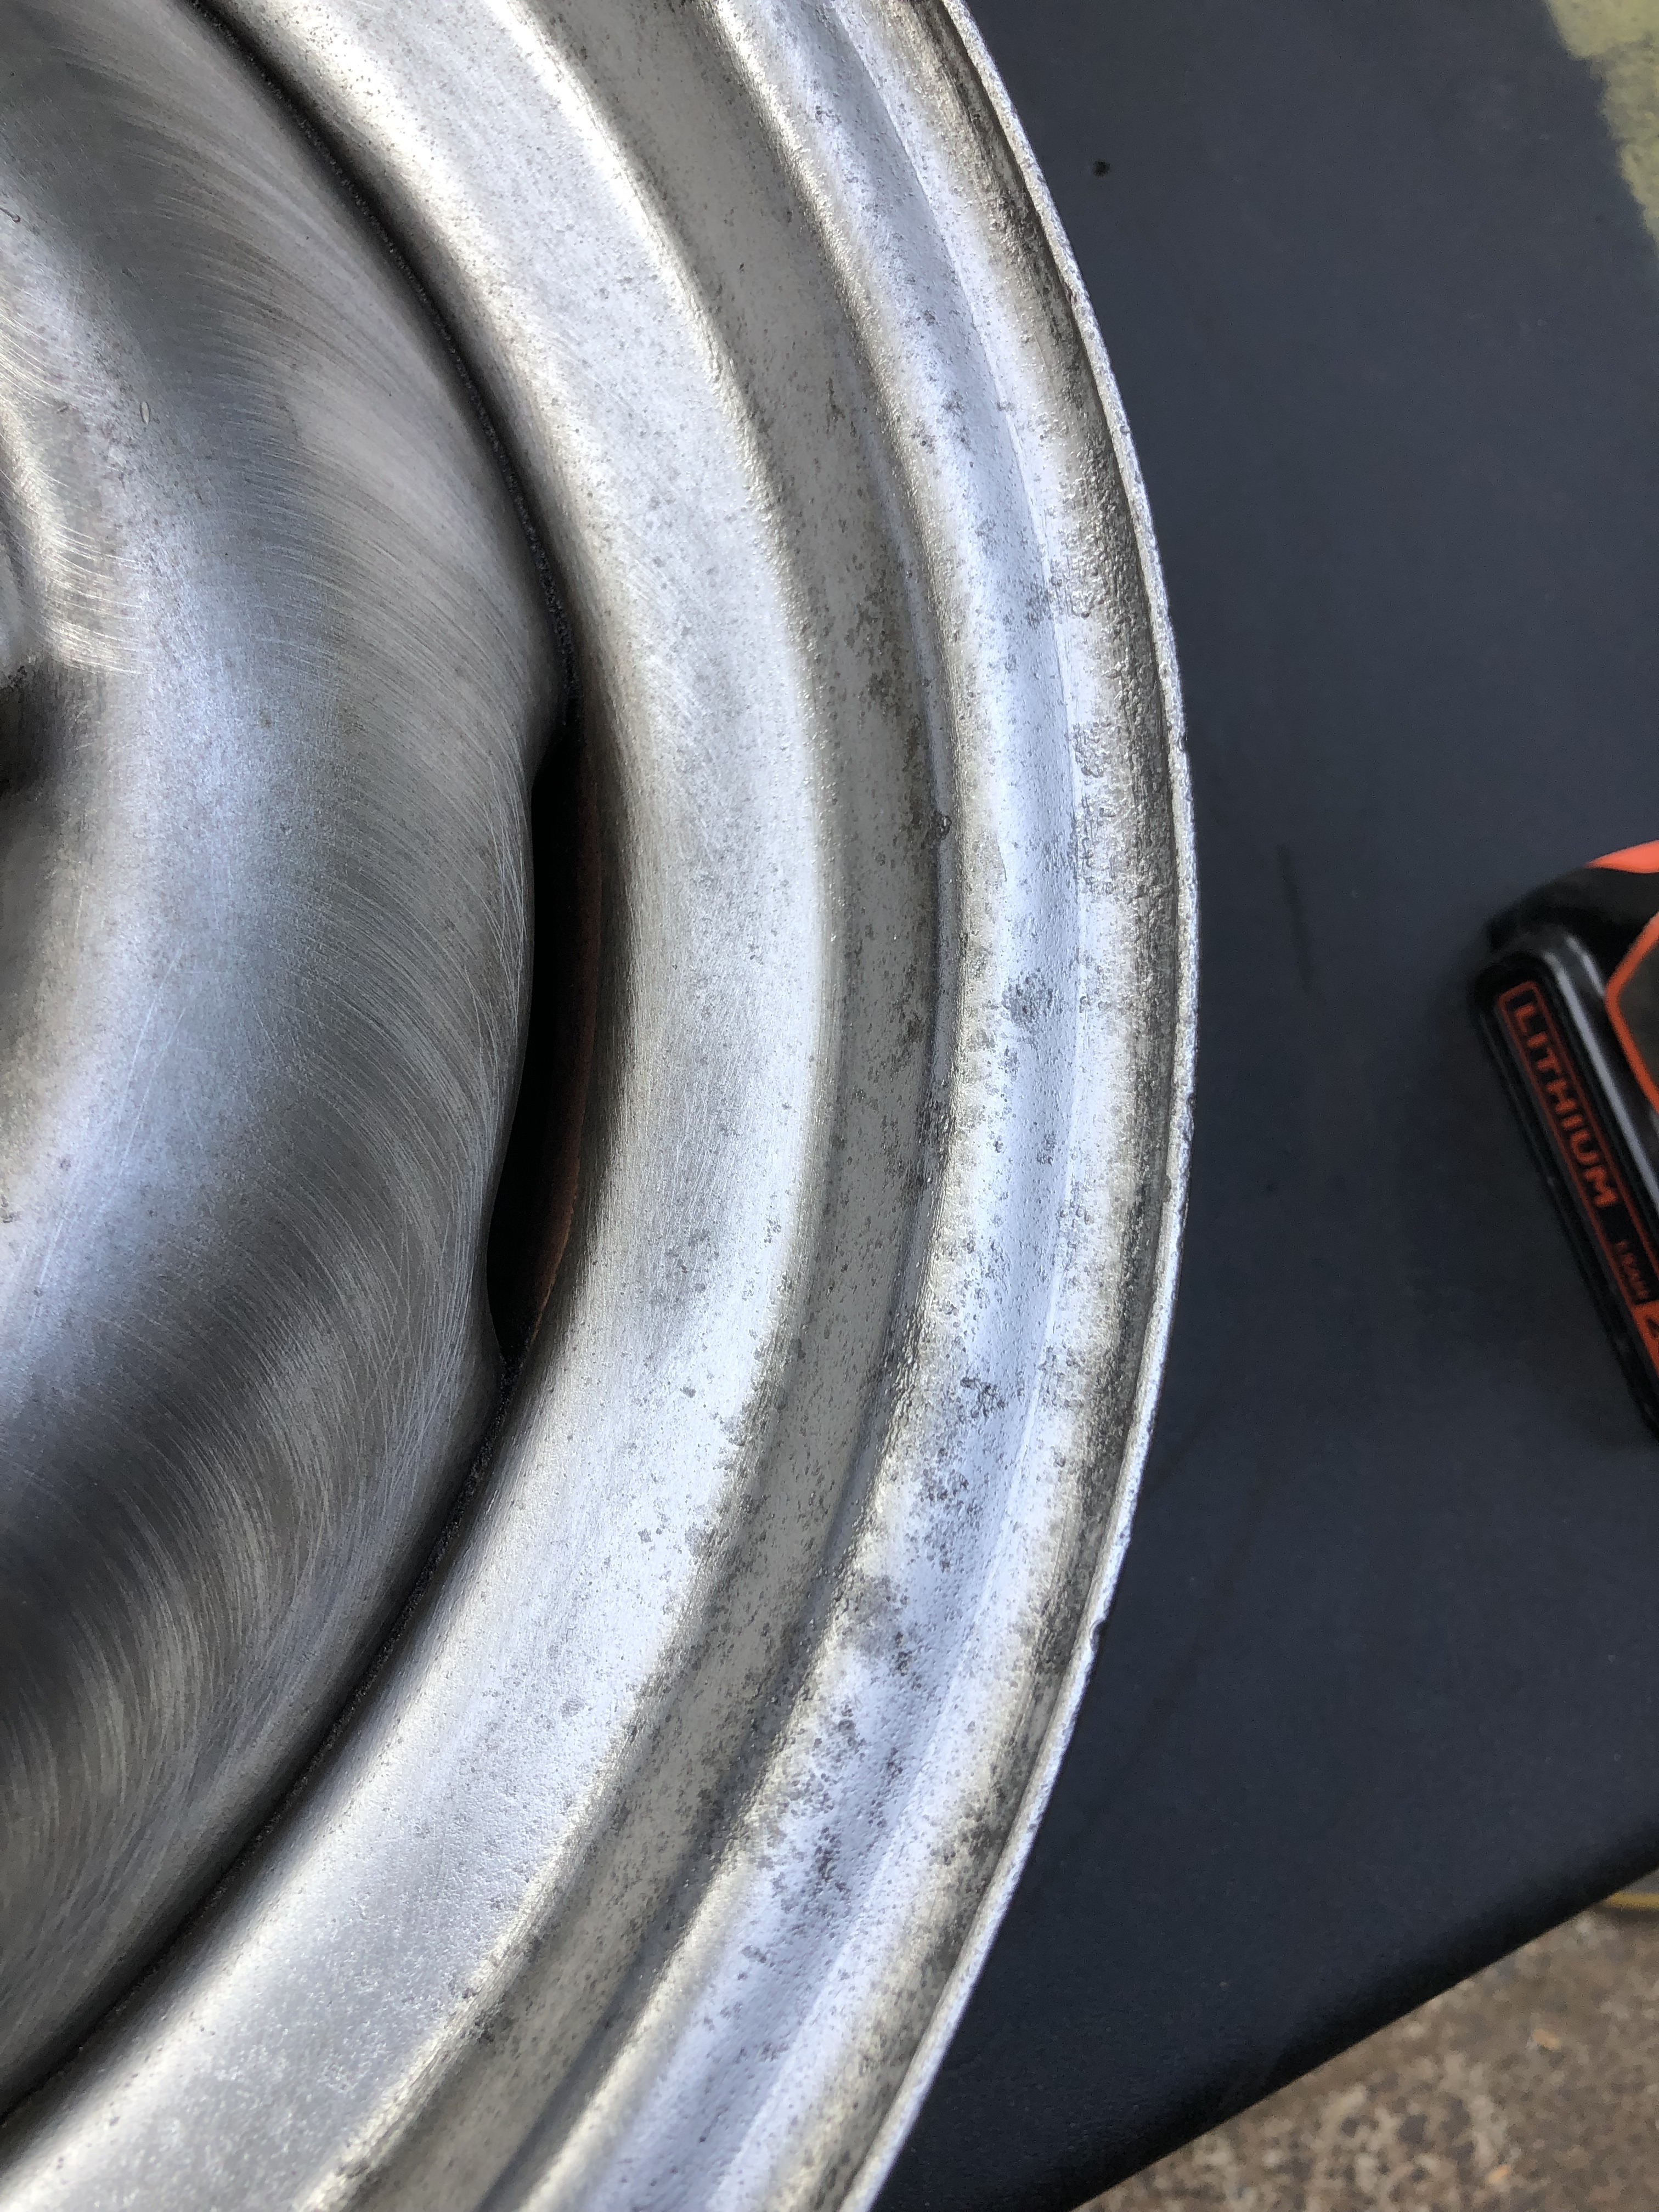

The debris came off like caked on dirt. The remaining paint under the trim clips came off with a screwdriver - and quite easily at that. The interior and back will be cleaned, the pits filled, and then shot with the finish paint color - hopefully later today or tomorrow, so that another wheel can be worked on.
The process uses less energy than sandblasting, and doesn't require a blast box. It's also easier on my old back than standing over the wheel for hours with a wire brush - and for some reason, what little wire brushing is done is less dusty - not to mention easy peasy!
Please let me know if these restoration tips are helpful. I'm a new guy on the Forum, and want to make sure these contributions are of value.
0 -
Thanks for the info.
0 -
This type of post is of value. Thanks for taking the time to document it.0
-
I may need to try this. Seems simple and can do other things while it 'cooks'0
-
EXACTLY! Rim # 2 is in "the soup"; I went around the car with penetrant again. Worked the vent windows open for the first time in 50 years. The best part of this process is the heavy lifting can be done while you're asleep! I'm gonna buy a kiddie pool or two at 75% off tomorrow so I can do larger sheetmetal parts. Eventually, I'll need more than two chargers, as the front suspension is going in as well.40indianssgmailcom said:I may need to try this. Seems simple and can do other things while it 'cooks'
0 -
Thanks for posting Chuck. I haven't tried this method before, but I will be soon.
0 -
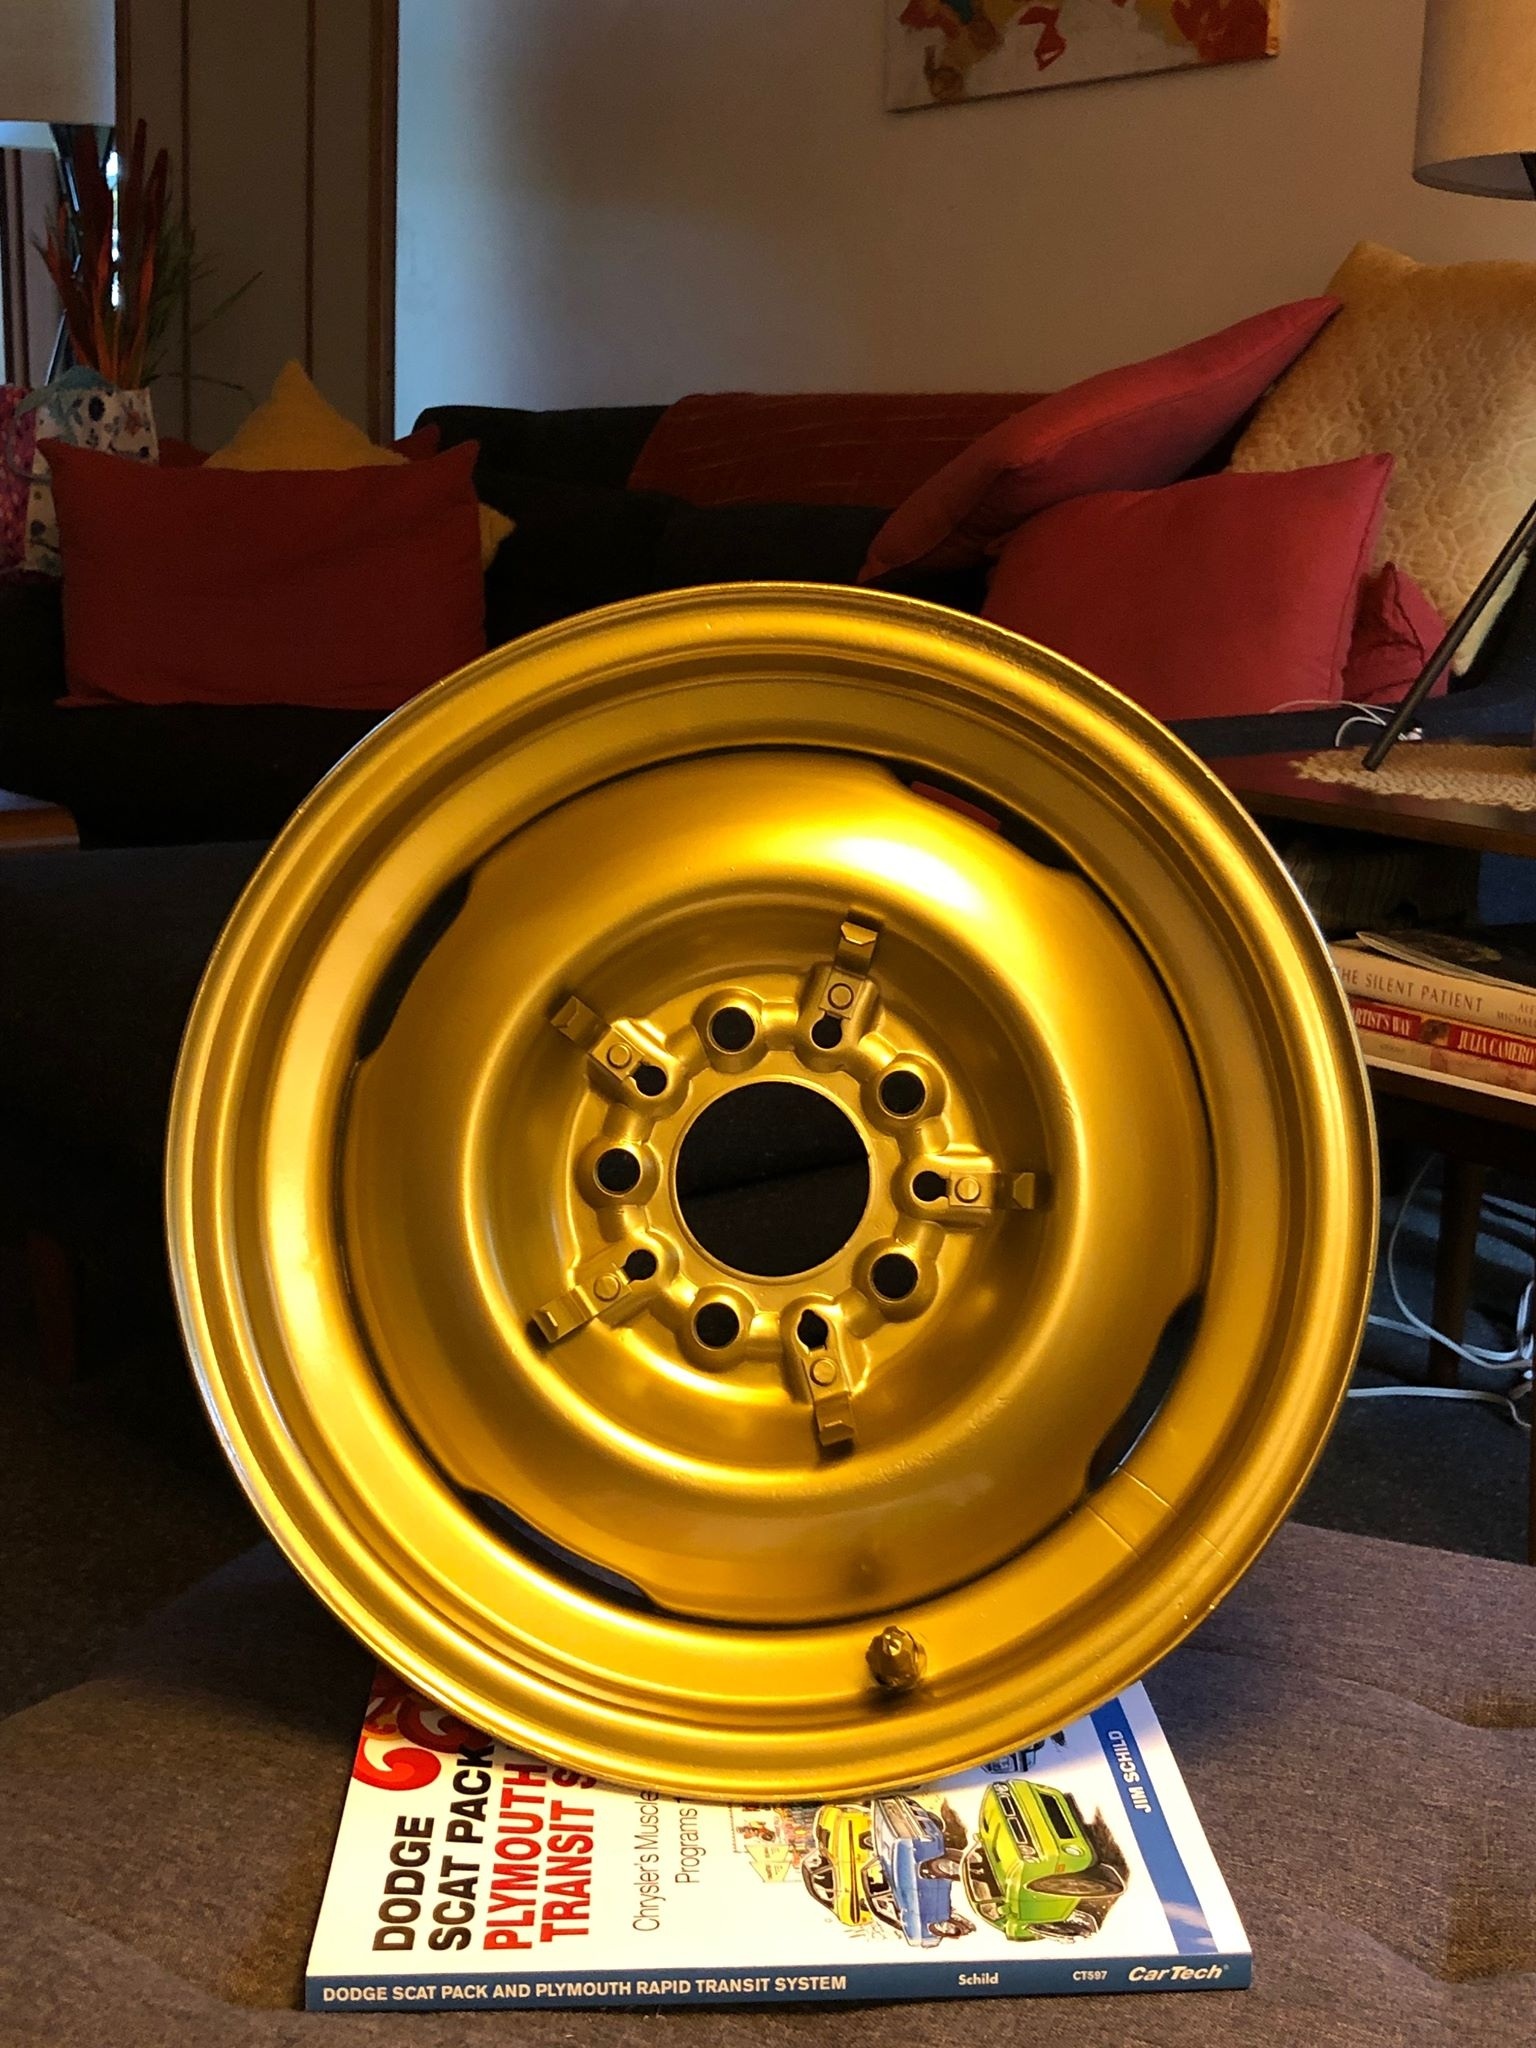
Here's what the finished product looks like. While it takes time to allow the process to work, the ease of cleanup and time to paint make it well worth it, in my opinion:
 0
0 -
you should edit your top how to post saying to do this in a ventilated area.
that gas released aint nice.
I use an old 60s model train controller to do mine. its big industrial kit that you can adjust the power. Can really get it all bubbling fast or slow it right down.
Also you can make up a wire mesh basket to hold small bolts, nuts etc. Although a tumbler is often an answer here.
Any laundry powder that is mostly if not totally sodium bicarbonate will work.
Also adding more sacrificial anodes around the sides of the tub will speed up the process.
0 -
I mentioned the sacrificial anodes and the hydrogen gas in the post. Please try reading it.KustomKreeps said:you should edit your top how to post saying to do this in a ventilated area.
that gas released aint nice.
I use an old 60s model train controller to do mine. its big industrial kit that you can adjust the power. Can really get it all bubbling fast or slow it right down.
Also you can make up a wire mesh basket to hold small bolts, nuts etc. Although a tumbler is often an answer here.
Any laundry powder that is mostly if not totally sodium bicarbonate will work.
Also adding more sacrificial anodes around the sides of the tub will speed up the process.
Most everyone has access to a battery charger, not everyone plays with trains. Also - old is subjective; something from the 60's is what I would have had. That's not old. Try curling the brim on your flat brim. It fits better. Trust me on this.
Why mention a tumbler? We're talking about electrolytic rust removal.
If you want to help people, please post your own instructions. If you want to be an armchair critic, well...I'm not impressed.
0 -
umm. soz bro.ChuckSherman said:
I mentioned the sacrificial anodes and the hydrogen gas in the post. Please try reading it.KustomKreeps said:you should edit your top how to post saying to do this in a ventilated area.
that gas released aint nice.
I use an old 60s model train controller to do mine. its big industrial kit that you can adjust the power. Can really get it all bubbling fast or slow it right down.
Also you can make up a wire mesh basket to hold small bolts, nuts etc. Although a tumbler is often an answer here.
Any laundry powder that is mostly if not totally sodium bicarbonate will work.
Also adding more sacrificial anodes around the sides of the tub will speed up the process.
Most everyone has access to a battery charger, not everyone plays with trains. Also - old is subjective; something from the 60's is what I would have had. That's not old. Try curling the brim on your flat brim. It fits better. Trust me on this.
Why mention a tumbler? We're talking about electrolytic rust removal.
If you want to help people, please post your own instructions. If you want to be an armchair critic, well...I'm not impressed.
didnt mean to upset you.
no need to get all defensive and go hindenburg on me but its the internet and an open forum. if you cant handle other peoples comments or posts just ignore them.
my bad - missed the Hydrogen bit.
again sorry for upsetting you.
//goes to corner to play with trains (great now i want some trains to hot wheel/slot car customize)
chuck you made me chuckle have a good weekend.0 -
Have you considered the phenomena known as "Hydrogen embrittlement"? I know you cannot paint springs or stressed steel parts with phosphoric acid, nor electrogalvanise them, because of the danger of breakage. I would be wary of using wheels that have the likelihood of failure.0


Categories
- 36.9K All Categories
- 111 Hudson 1916 - 1929
- 20 Upcoming Events
- 92 Essex Super 6
- 28.6K HUDSON
- 569 "How To" - Skills, mechanical and other wise
- 995 Street Rods
- 151 American Motors
- 178 The Flathead Forum
- 49 Manuals, etc,.
- 78 Hudson 8
- 44 FORUM - Instructions and Tips on using the forum
- 2.8K CLASSIFIEDS
- 606 Vehicles
- 2.1K Parts & Pieces
- 77 Literature & Memorabilia
- Hudson 1916 - 1929 Yahoo Groups Archived Photos