Brad's 52 Hornet Sedan Build Thread

Snailslayer
Expert Adviser
Ive been lurking long enough and figured I should start my own build thread to help keep myself motivated. Im posting in the Street rod forum as Im planning on adding some custom items, modern updates and personal touches to the car.
I set out to find a 52 Hornet last year to use as a family commuter for summer months, and to have a car that was big enough, and safe enough to haul myself, wife and toddler to car shows or other functions. I chose 52 as I like interior color and style, the body style, trim and running gear the best of the stepdowns. A 4 door was the chose becsue of price, user friendliness to tote a family around in and I never really understood why coupes are more sought after in the first place.
Heres some pics of the car when I bought it and drove it home about 100 miles last October.
0
Comments
-
The car: The car has a numbers matching 308 that was rebuilt in '93 as tehe reciept shows. The Dual range hydramatic works and shifted well. The bias ply white walls and loose steering left something to be desired on the way home that had my knuckles white a couple times.
It has all the original upholstery and much of the brightwork was redone in the early 90's as well. The paint was a 10 footer in a Teal color that many people have told me they like the color of alot. I dont so much and it will be changed. The original color of Cream or Ivory is still under the truck and hood.
It has a few rust issues in the rear perimeter frame and lower A pillar. The wiring is all original and is still 6V Positive Ground. I know a rustfree car is best, but the completeness, good brightwork and good drivetrain on this car were the tradeoffs i succumb too.
0 -
Thanks for "coming out of the closet":ohmy: - Welcome to the board. It'll be great to see your progress, although I must admit, that's a real nice car, right out of the box. I think you're right about the color- it doesn't do anything for me, either. I guess I'm too used to seeing the drab original colors, so it just looks too flashy.
Looks like a pretty good driver, as is. Other than fix the things that need fixin', what kinds of "custom" things to you plan to do? As you can see by my avatar, I'm not exactly a "purist". . .0 -
First thing I did is take the seats out for cleaning as they stunk terribly of moth balls, so much so it made my wife sick. Upon tring to clean the stink out, i decided to remove the upholstery hog rings and see what was lurking underneath. I found the mice packed the springs full of nesting, and stainded the burlap and yellow padding with urine among other things.
ultimately I decided to get some fresh upholstery and padding in there as the Originals are stained pretty bad and the stink is unbearable, even after airing out, steaming and febreezing. So, out came the door panels and trim panels, to be cleaned up and reused, or used as patterns. they had to come out anyway so i could access the floorand and surrounding metal for POR-15 treatment. I should have documented the disassembly of them, but the camera wasnt near.
I called and ordered some dead on 52 Hornet Brown cloth upholstry from SMS auto fabrics in OR (thanks to Niels for the info) and some other company Generic brown Vinyl thats close enough for me. You may or may not be able to tell, but the original cloth was stained, and so uniformly faded i didnt know if it was originally a cool looking green and yellow stripe with tan cloth, when not faded pieces and the SMS sample was a medium brwn with brown and gold stripes. If you look close you can see.
0 -
The PO said teh engine only had about 1000 miles on the rebuild. upon driving it home and toodling around the block before winter, the radiator was puking foam and water began seeping through a couple head bolts. it seeemed to run well all the way home, but never having driven a Hudson before I had no frame of reference.
Because winter started and it was parked, I drained the water and pulled the head.
The headbolts were heavily corroded and no where near torqued evenly or torqued to spec besides a few. the head gasket i pulled out was intact but showed signs of uneven torque setting and water seepage and some corrosion. I am glad i pulled the head off. I ordered a new Best brand head gasket and bolts from Dale Cooper and got grade 8 washers from the LAPS. Ive been wire wheeling the carbon and corrosion off the mating surfaces. I mic'd the head and it came in at 1.94" thick, its a 308 iron head.0 -
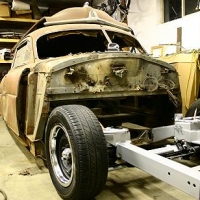
After the Interior was gutted and the engine down do to the head gasket, I focused my attention on the rust issues. I knew It had issues when i bought it as they were evident upon inspection, but i decide to forge ahead and buy it anyways.
First, I removed the the rear bumper guards, rear bumper and taillights. thats straightforward enough. The rear skirts are held on by little spring clips and pop off easily. In order to remove the fender, you have to remover the 3/4"? or so trim moulding. the brackets were very rusted and came of with the moulding.
I had to take a cut off wheel to cut the through screws that held on the skirt spring clip retainers and cut off teh rear trim piece as these were all rusted solid. The rear fender has a rubber strip sandwiched between it and the frame. there is also a foam stip adhered to the frame that is from 3/4" - 1 1/4" thick the lower fender seals against.
As you can see the outer frame is toast and need to be refabbed.
0 -
After calling in a Local fabrication shop to get an estimate on the repair of the rear frame, I set out to remove the other fender, gas tank and anything else that would get in his way and cost me extra money to have him tinker with. So I set out with an assortment of wire wheels, angle grinders and high speed drills to clean up the effected areas and prep for POR 15 coatings upon the return of a repaired car.
I found out the undercoating is pretty tough stuff. Also, it is retaining teh mothball stink as i grind it off it releases it more so. another reason I am cleaning it all out.
The trunk pans will need replaced/ fabbed from the fender wells out. the outer frame is toast, but the rear is just fine - thats good news. the inners will need some patch work to boot. The rust starts right in front of the rear tire
The tire wells are spot welded on the lip surrounding them. I drilled them out and any spot welds i could see holding the rusted trunk pans to the frame as well.
Here is where she stands right now.
Next step is deciding if I want to C channel the inner frame. My current issue is removing the lower rocker trim. the screws are rusted pretty good, and they are recessed just so so a cutoff wheel mght damage them. I dont think penetrating oil will reach and do much good, and it dulled teh drill bit when i tried that. any easy ways to free them up?0 -
Mike (WA) wrote:Thanks for "coming out of the closet":ohmy: - Welcome to the board. It'll be great to see your progress, although I must admit, that's a real nice car, right out of the box. I think you're right about the color- it doesn't do anything for me, either. I guess I'm too used to seeing the drab original colors, so it just looks too flashy.
Looks like a pretty good driver, as is. Other than fix the things that need fixin', what kinds of "custom" things to you plan to do? As you can see by my avatar, I'm not exactly a "purist". . .
Mike, thanks for the compliment. Much to the dismay of my wife, I took a running driving car and made it a Project. I set out to buy a driver quality car, and did. It did look good as is, but the moth ball stink made it undrivable and unridable by my family. So out the interior came. It needs rewired pretty bad, and a carb rebuild. so as we get taking things off, you know just 10 more screws and this comes off and i can clean it. well, if its down this far i might as well... (you fill in the blank here). So here we are.
As far as my plans with it, a fellow forum member is in the works photoshopping my car into its future self. It will include lowering about 4" around, going 12V, running a custom disc brake setup on the front (maybe rears too) dropped spindles, lowered springs with some larger diameter rims. AS for the driveline, Im keeping the rebuilt 308 mil and Dual range Hydro as they work and I think they are cool. But I will be updating it for reliability standpoint as I wish to crank on about 7k-10k miles annually with my toddler in tow.
this includes crank fire trigger ford EDIS ignition, and programmable EFI setup with a custom aluminum IR intake manifold for 3) 2bbl Weber IDF throttle bodies. COP or CNP setup. I have the clifford headers already. a dodge radiator is on the way. Vintage A/c is way down the line like mjsand's 52 hornet sedan has. elec Wiper conversion, Tach in place of the Clock on the dash, custom center armrest and thats what i can think of now.
The EFI stuff Ive never played with, but there is a big aftermarket support for some brands and its been around long enough the bugs are worked out. I debated about running all stock or going the other way. With original parts disappearing and becoming more obsolete, I will keep my parts I have and just upgrade/ customize immediately instead of changing horses mid stream.0 -
Very nice car, way to jump into it. Thanks for sharing your progress here !
Curently de-stinking my truck seat:(
Matt0 -
Yes....great work Volksheime!! Eventhough you have some rot around the outside, it looks like you've also got plenty of good metal as well. Keep up the good work...and don't forget to wear your dust mask :-)
Lee0 -
thanks, its all grunt work so far. the outer frame needs to be replaced as I could stick a screwdriver through about anywhere. The drivers side is worse. Using the existing frame as a template before remova should be doable, then to cut it where it bends down into the rocker and right where it attaches to the middle perimeter frame/ inner frame T as thats solid enough to weld to. spot weld it back to the wheel well, and voila. then it just drilling the fender bolt, spring clip and trim holes in the lower part as needed.
With wanting to Lower it 4" in the rear, Im considering Jamco 4" lowered leaf springs. If C channeling is necessary, now is the time as the inner frame needs alittle patch work. My concern with C channeling if the driveline can take it with a 2 piece drive shaft setup. I dont want to mod the tunnel and back seat really. Also, if the lowered springs will have the same spring rate and ride quality as stock.
I try to wear a dust mask but I found a really good way to keep the dust down. If you have access to a wood working dust collector/ blower type vacuum, the type with a 4" hose, use it. If you turn it on and lay it very near your work area as you grind it will suck up alot of the airborne dust before it reaches you. it wont do really well in keeping it clean per se, but the chunks that are big enough to evade the vac fly out of the way anyway. A stand shop vac helps, but doesnt move alot of CFM so it has to be much closer to the point of contact to be effective, which is tough with only 2 hands to run a grinder and hold the hose. Always wear a dust mask regardless.
I find using a 3" coarse wire wheel with a 1/4" shank used in my 110V high speed drill works well for removing the undercoating. holding it at a 30 degree angle and doing 1 2" swath at a time gets it done. Its dirty and it sucks yes, but it keeps me out in the garage.
a HAMB post suggested a Harbor frieght little needle scaler for removing undercoating also. Im going to try that next.0 -
Great read keep it coming!
") 0
0 -
Thanks for sharing the pictures on your project Brad. Looking forward to seeing more.
Keep up the good work.
Lee O'Dell0 -
Volksheime- got your message- did you get my reply? Can't really tell if it went through, with the way the PM system is set up.
Mike0 -
No, I didnt get it. resend or email directly at HETbradley_due@hotmail.com (drop the HET.
thanks
Brad0 -
I moved my 6000lbs capacity mid-rise scissor lift into my garage last weekend. This is the best tool I purchased so far. It raises to about 48" high. perfect working height for most things, only downside is its under the driveshaft. its 110V hydraulic lift. New they run about 1300-1600 bucks. I picked this up used for around half that on CL. It makes working on the cars SO much more enjoyable, you wouldnt beleive it. its portable too.
With it up in the air, heres some more pics of the rust issues.
0 -
With it being past bed time and having to keep noise to a minimum I decided to give removing the stainless a go. this is not a fun task. After trying to remove the lower skinny trim by prying it off the retaining strip adn subsequantly destroying it, I evaluated my options. I realized teh retaining strips are all going to be stubborn and rusted, and they will have to be my sacrificial lambs. So using a couple gasket removing type metal scrapers i pryed the entire assembly, with retaining strip and chrome/ stainless off the doors and front fenders where the screws are not accessible to be ground off to let them go. with some effort they let go. trim distortion was minimal. door panel distortion was minimal, and since its getting repainted, it will be repaired at that stage. I found much corrosion under teh strips, and yup the retaining stripes were all toast. I heard K-Gap has repops of them, and Maas' for the skinny trim. I hope")
Im looking for a better way for the window trim, im quite scared to try and remove it actually.
0 -
Trick to this is pre-oiling the trim before pulling it off. I am assuming you are going to strip the body down so getting something like WD-40 in there will not matter. Spray down the trim making sure to get the penetrant in behind. Soak it good then do it again for a coupe of days.
Then get yourself a Richards paint scraper and you use this to slowly and carefully pry the trim up from the retainer. Start at one end and slowly move the length of the trim bit by bit. Never be in a rush as you will deform the trim.
Last year I removed all the trim off a 54 sedan this way and did not bend anything. Took me all day and as I went along I would spray a little more oil behind trim to loosen things up.
The key is the Richards paint scraper its just the right shape to pry up the trim. There is a tech note on using this method somewhere on net I will look for it.
Found it look here http://socalhet.resk.info/socalhet/sidebar/tips/trim.pdf0 -
I made a little progrees on the hornet this weekend. I removed the rocker covers fully, it took grinding off the screw heads on the front. I tried to clean out the rocker frame, it was full of the wire mesh, dirt and mouse nests. Then I removed the inner fender on the passenger side. this was just a matter of a half dozen bolt/ screw things holding each piece on. I will have to make a new mud flap when the time comes, it was stapled to the lower frame piece.
0 -
Little progree has been made. I did finally get the material in from SMS today. heres a couple pics of the new material that is supposed to be a dead nuts match to the Original. its almost 100% match. the only thing is the stripes are about 10% wider than the OG so the spacing is a little off. but thats knitpicking.
heres a armrest picked up from john o in Il for a custom factory look front armrest project of mine. lady bugs spilled out.
I went to the Iola car show/ swap meet as Well last weekend. Picked up a couple hubcaps for my 52 and cleaned them up. also picked up this hubcap looking thing as a wall hanger, anyone identify it? I met 2 fellow chi/milw club members there inthe swap meet. super nice guys. searched all day for hudson parts, only 2 booths had them. the guy I bought the hubcaps from has a early twin h setup complete for $850obo. also had some early hub caps, new stepdown radiator adn some random front sheet metal NOS.
Saw 3 hudsons on friday at the Show... Gary Gillans 52 hornet sedan and Nells 52 hornet sedan. ill try to post up some pics. also there was a mint green 46-47 pickup truck, looked nice from 50 yards away but didnt get closer as I was heading to the car.0 -
Havent posted in a while. The Hornet is at the Fab guys shop currently. I stopped by to see the progress and he had 1 side almost done. still had the other side to do and the rocker rust, rebuilding the trunk floor and a couple misc projects. I think hes doing a great job. He said he will have about 90 man hours into fixing the issues. im plunging ahead with it anyways, and thinking about picking up a semi local rust free shell for a future project. I bought a Hudson title at the Jefferson Swap in WI last weekend, just to have for a titless project should one come up.
Here is a pic of the Weber IDF 6061 Aluminum carb flanges i had made and a pic of the mock up on the floor with the runner tubes with the clifford headers for a visual sake. still waiting on my head flanges. Im researching the best ITB bore size (40mm, 44mm 48mm) for the 308 street engine. hopefully the hudson will respond well to the weber setup.
0 -
Holy tri power! That's a pretty sweet setup. got any plans to reproduce that manifold? I 'd be interested in one.0
-
I may be able to offer some duplicates of the manifold, but need to get one working first. Im making it so i could use either weber IDF's (40, 44 or 48) or the IDF Throttle bodies as the throttle bodies have the injector bung included (ie not in manifold itself) let me get this one done and we will see about making other available as to cost etc. thanks0
-
No prob, I have 44 IDFs on my Beetle. It would be nice to keep my eggs in one basket. The triple Webers (be it side or down draught) would have an awesome look to it.0
-
I also have 44 IDFs on my 66 and thats why i chose to run them on the Hudson. they are familiar to me and abundant to buy as needed through weber or empi dealers as needed.0
-
volksheime wrote:Havent posted in a while. The Hornet is at the Fab guys shop currently. I stopped by to see the progress and he had 1 side almost done. still had the other side to do and the rocker rust, rebuilding the trunk floor and a couple misc projects. I think hes doing a great job. He said he will have about 90 man hours into fixing the issues. im plunging ahead with it anyways, and thinking about picking up a semi local rust free shell for a future project. I bought a Hudson title at the Jefferson Swap in WI last weekend, just to have for a titless project should one come up.
Hi Brad....looking great!! So on the perimeter frame around the back wheel, did you have him replace the entire section from fwd of the wheel around to the back frame? It looks like you used a flat strip for the outer piece and a "c" channel for the inner piece rather than trying to reproduce the "hat" section. Looks really good - I need to put a couple patch pieces in that area myself. Thanks for sharing!
Lee0 -
I got the Car back last week. the rear frame is repaired alond with the lower A and C piller rocker areas. I think he did a bang up job and Im happy. He refabbed teh entire section from in front of the rear tire arch to the inner frame on both sides, patched the inner frame, patched the rockers, remade the sides of the trunk pans and seam sealed it. He used a lil thicker gage material, it should last a long long time.
Took him 65 man hours + materials for anyone who wants to know what it takes to repair the rust. He said he would never repair another rusty Hudson :ohmy:
If we had repair sections, I dont think it would be a huge issue, but the geometry is tough to fabricate. Its not 100% stock, but its good enough for me and way safer than before.
He also added a little brace for the rear Quarters to bolt to. I had him remove the spare tire well, to make room for a larger stainless steel fuel tank in the near future with built in fuel pump for the EFI system.
0 -
I got the Car back last week. the rear frame is repaired alond with the lower A and C piller rocker areas. I think he did a bang up job and Im happy. He refabbed teh entire section from in front of the rear tire arch to the inner frame on both sides, patched the inner frame, patched the rockers, remade the sides of the trunk pans and seam sealed it. He used a lil thicker gage material, it should last a long long time.
Took him 65 man hours + materials for anyone who wants to know what it takes to repair the rust. He said he would never repair another rusty Hudson :ohmy:
If we had repair sections, I dont think it would be a huge issue, but the geometry is tough to fabricate. Its not 100% stock, but its good enough for me and way safer than before.
He also added a little brace for the rear Quarters to bolt to. I had him remove the spare tire well, to make room for a larger stainless steel fuel tank in the near future with built in fuel pump for the EFI system.0 -
Looks great Brad!!! Damn....only 65 hours and he's calling it quits on Hundons :-)
Wish I would've got to him before you did :-)
Looks like you've already got the rear quarters on it!!
Lookin' great....keep us posted,
Thanks,
Lee0 -
Lee, the quarters are only on for mock up, to make sure everythin lined up etc. they are coming back off soon. I tore off teh front fenders, the hood and all the front end sheet metal. Next im pulling the drive train and dash componenants and stainless- getting the shell ready for a thorough wire wheelin' and soda blasting the inner and outer. then on to POR-15 or Rust bullet everywhere. Debating whether or not to spray it or brush it on but i got some time to figure that out.
The fab guy called the perimeter frame repair work quits, but the other custom fab work he will trudge forward. I got my intake flanges and tubing in, so once i pull the drive train, im have those TIG'd up as they are needed to bolt the flanges to. then he will fab me up a fuel tank. Once it all gets put back together He will get the rear ride height nailed down with a C notch and some tunnel massaging. Im going to run dearched leaves with blocks to get down about 3-4 " static drop... but it will depend on how it sits with full weight on it first and how far i can drop the front. The panhead bar will have to be altered to so she dont dog track down the road.
Im working on custom Custom dropped spindle setup with some Mustang brakes in the mean time. it they dont work out, Ill probably go the ol' tried and true 2" drop springs and blocks and call it a day.
Im looking forward to my intake manifold hoping it works out and can be fabbed. then i can start buying the ITBs, fuel rails, fuel pump, and having some fun learning the Softwarre as well. I got my EDIS in the mail the other day, so now im looking up advance curves vs vacuum signals and then... oh man it never ends, but its all part of the fun?!0 -
Got my IDF 6061 AL block flanges in. They are CNC'd and the transitions from round to square will be hand finished for a nice flow. I think they look cool no matter if they work or not :cheer:
Here they are in pieces.
0


This discussion has been closed.
Categories
- 36.6K All Categories
- 85 Hudson 1916 - 1929
- 11 Upcoming Events
- 73 Essex Super 6
- 28.4K HUDSON
- 511 "How To" - Skills, mechanical and other wise
- 990 Street Rods
- 150 American Motors
- 170 The Flathead Forum
- 47 Manuals, etc,.
- 71 Hudson 8
- 40 FORUM - Instructions and Tips on using the forum
- 2.7K CLASSIFIEDS
- 592 Vehicles
- 2.1K Parts & Pieces
- 76 Literature & Memorabilia
- Hudson 1916 - 1929 Yahoo Groups Archived Photos